
大家好,我是苏雪,我来讲讲多体节召唤物的写法。弄成基类(做基类是一个一个麻烦的事儿啊~
首先感谢裙裙的在线指导,陪我一起踩了个大雷(哭)
因为原版的方法写的乱七八糟的麻烦的很(八万个遍历)而且还有个追击偏移问题(说的就是你星尘龙),所以这边的方法是重新搞出来的。
多体节嘛,分为逻辑弹幕,和头身尾四节,并且只有身体占用召唤栏,当然计算体节(用于设定伤害)时也只算身体。所有的行为都由逻辑弹幕来控制。
原版中是让身尾遍历上一节并追着他跑,这里我们直接在逻辑弹幕中维护两个列表,体节弹幕列表与位置角度列表,来直接设置,这样就能大幅减少计算量。
前置知识与事前准备
因为本篇教程是对mod中很多知识的一个综合运用,所以请各位对制作mod还不熟悉的话先阅读下边的教程,否则你在阅读本篇教程时可能会比较懵逼。
前置知识:
要准备的(下面会提供星尘龙素材,可以先拿来试一试):
- 召唤杖的贴图
- 召唤buff的贴图
- 弹幕的贴图
逻辑弹幕基类
那么就进入正题吧。逻辑弹幕,用于控制行动,定位,碰撞,给玩家上buff,掌管体节的生杀大权(迫真
首先,我们创建一个抽象类,继承 ModProjectile 。然后随便给它弄个贴图
public abstract class BaseLogicProj : ModProjectile
{
    // 其实我想写中文类名
    public override string Texture => "Terraria/Images/Extra_98"; // 反正逻辑不画,随便给写个贴图,这张是个很常用的万能贴图
}
SetDefaults
简单设置一下弹幕的基础属性,请设为正方碰撞箱,并注意穿透与独立无敌帧。将 usesLocalNPCImmunity 设为 true 以启用独立无敌帧(即同类弹幕无敌帧将会独立计算,并且可以设置无敌帧时间),localNPCHitCooldown 就是无敌帧时间。
public override void SetDefaults()
{
    Projectile.width = Projectile.height = 32; // 正方碰撞箱
    Projectile.penetrate = -1;
    Projectile.usesLocalNPCImmunity = true;
    Projectile.localNPCHitCooldown = 10;
    Projectile.minion = true;
    Projectile.friendly = true;
    Projectile.ignoreWater = true;
    Projectile.tileCollide = false;
    Projectile.netImportant = true;
}
自定义属性、字段
public Player Player => Main.player[Projectile.owner]; // 偷懒用的
public int itemDamage; // 作为实时更新伤害的基数,传入武器基础面板
public int buffType; // 给玩家添加buff的type
public int tail; // 用来存尾体节的whoami
public virtual float Offset => 1f;// 设置体节位置时的偏移率
public abstract bool ModPlayerMinionBool { get; set; } // 继承了ModPlayer类中对应的召唤物bool属性
public List<int> proj = new(); // 弹幕list,存入弹幕WhoAmI,不计尾体节
public List<(Vector2 pos, float rot)> data = new(); // 数据list,计入尾体节,故count是proj.Count + 1
AI
光速进入本篇重点——逻辑弹幕AI。
这个AI比较复杂,不要急,我们一步一步分解。
- 对于右键击杀弹幕的判定
- 给玩家上召唤物buff
- 运动逻辑
- 维护弹幕列表与数据列表
- 实时更新弹幕伤害
- 计算并设置体节数据
前两步作为BaseAI,行动逻辑摸了,后三步单独讲。
BaseAI
维护弹幕,维护buff。
public void BaseAI()
{
    // 玩家死了干掉弹幕
    if (Player.dead)
    {
        ModPlayerMinionBool = false;
    }
    // 有buff保持弹幕,buff中会把这个bool设为true,后面会写到
    if (ModPlayerMinionBool)
    {
        Projectile.timeLeft = 2;
    }
    Player.AddBuff(buffType, 2);// 给玩家上对应buff
}
运动逻辑
这块你们自由发挥,本篇会直接把隔壁星尘龙AI扒拉过来用。不过在这里预定义一个运动逻辑以便之后重写。
public virtual void ActionAI() { StarDustDragonAI(Projectile, Player); }
维护弹幕列表与数据列表
游戏中总会出点意外情况。比如,召唤药水过期了,你把召唤类装备或饰品给拆了,之类的。此时就需要把死掉的(因为召唤栏为不足被挤掉的)弹幕给移除出列表,以防止出错。(以下代码写在AI中)
for (int i = 0; i < proj.Count; i++)
{
    if (!Main.projectile[proj[i]].active)
    {
        proj.RemoveAt(i);
        data.RemoveAt(i + 1);
        i--;
    }
}
实时更新弹幕伤害
使用传入的基础伤害,将召唤伤害加成应用到上边,并乘以体节增伤系数。在继承后想要修改倍率可以进行重写。
// 参数是身体体节数量,返回伤害倍率。这里是每节增加的伤害衰减10%,最多衰减5次,即从召唤第6节开始每多一节增伤约60%
public virtual double ModifyDamageMult(int count)
{
    return count * Math.Pow(0.9f, (count - 1) > 5 ? 5 : (count - 1));
}
计算并设置体节数据
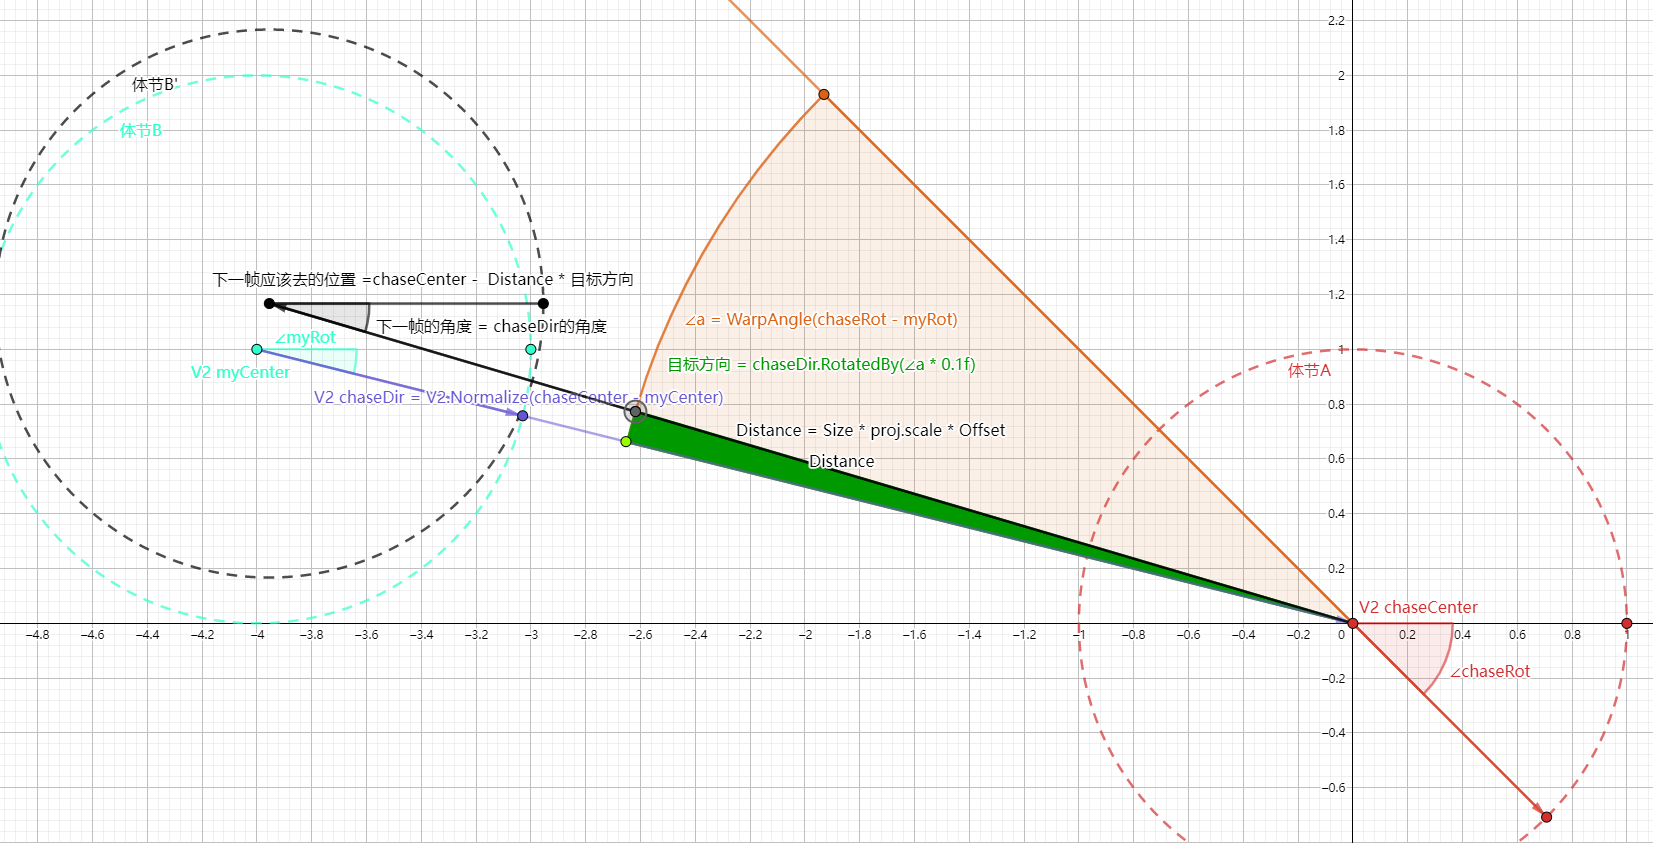
数学时间~
public static (Vector2 pos, float rot) CalculatePosAndRot((Vector2 pos, float rot) tar, (Vector2 pos, float rot) me, float dis)
{
    Vector2 chaseDir = tar.pos - me.pos;// 当前的位置到目标的位置
    if (chaseDir == Vector2.Zero)// 如果这两坐标怼一起了就分开,防止位置变成Nan
    {
        chaseDir = Vector2.One;
    }
    chaseDir = Vector2.Normalize(chaseDir);// 向量单位化
    float chaserot = tar.rot - me.rot;// 目标角度的和当前的角度差
    if (chaserot != 0)// 角度即弹幕的运动(视觉上)方向,当方向不同,就每帧修正这个方向,修正值是差值的10%
    {
        chaseDir = chaseDir.RotatedBy(MathHelper.WrapAngle(chaserot) * 0.1f);
    }
    Vector2 center = tar.pos - chaseDir * dis;// 让目标位置减去修正后算上距离的追击单位向量,即是下一帧应在的位置
    return (center, chaseDir.ToRotation());// 返回应在位置和修正后角度
}

// 用于设置体节数据
public static void SetSection(int whoami, (Vector2 pos, float rot) data, double damage = 0)
{
    Projectile p = Main.projectile[whoami];
    p.Center = data.pos;
    p.rotation = data.rot;
    p.timeLeft = 2;// 保证弹幕存活,且在逻辑弹幕被右键buff取消后马上死亡
    p.originalDamage = p.damage = (int)damage;// 给体节设置伤害,用于如果你们想让体节射出弹幕进行攻击之类的时候
}
汇总
接下来,在AI函数中调用以上的所有方法。
public override void AI()
{
    // 基础AI
    BaseAI();
    // 运动AI
    ActionAI();
    // 维护弹幕列表和数据列表,在其内有弹幕死亡(召唤栏突然减少)时剔除元素
    for (int i = 0; i < proj.Count; i++)
    {
        if (!Main.projectile[proj[i]].active)
        {
            proj.RemoveAt(i);
            data.RemoveAt(i + 1);
            i--;
        }
    }
    // 设置伤害
    Projectile.originalDamage = (int)(ModifyDamageMult(proj.Count - 1) * Player.GetDamage(DamageClass.Summon).ApplyTo(itemDamage));
    // 防止你自己写运动逻辑并忘了写这个
    Projectile.rotation = Projectile.velocity.ToRotation();
    // 更新数据[0],是逻辑弹幕的中心与角度
    data[0] = (Projectile.Center, Projectile.rotation);
    // 设置头体节的数据
    SetProjSection(proj[0], data[0], Projectile.originalDamage);
    // 重新计算data中的位置与角度,第一个数据是逻辑弹幕中心与角度,不需重新计算
    // proj未计入尾体节,但data有,所以这里是从1开始且 <= proj.Count
    for (int i = 1; i <= proj.Count; i++)
    {
        // 注意,calculate方法的第三个参数距离,传入弹幕的 碰撞箱宽 * 缩放 * 继承后可重写的偏移率
        data[i] = CalculatePosAndRot(data[i - 1], data[i], Projectile.width * Projectile.scale * Offset);
        if (i < proj.Count)// proj中没有尾,是 <
        {
            // 设置身体节的数据
            SetProjSection(proj[i], data[i], Projectile.originalDamage);
        }
    }
    // 设置尾体节的数据, 逻辑弹幕的ai[1]是尾体节的WhoAmI
    SetProjSection((int)Projectile.ai[1], data[proj.Count], Projectile.originalDamage);
}
AI部分到此结束。头身尾AI不至于在这写吧()
重写碰撞箱
按照逻辑(),逻辑弹幕并不造成伤害,所以打伤害要由头身尾来做。但是仔细观察星尘龙你就能发现,他并不是每个体节都能独立的对NPC造成伤害,而是所有体节共享一个无敌帧。虽然我不知道他怎么写的,但是这里使用一个方便的写法——重写逻辑弹幕碰撞箱,将伤害判定区域变为data列表中的位置,这样一来就只使用了逻辑弹幕的无敌帧,且视觉上造成伤害的弹幕就是头身尾体节了。之后,将体节的 CanDamage 函数 return false 即可,或者也可以使用 Main.projPet[体节的type] 将体节弹幕标记为宠物以屏蔽弹幕的接触伤害(乱用属性孬)
// 弄个方便的方法,传入中心坐标和宽度,返回宽高等于传入宽度且中心是传入的坐标的矩形(碰撞箱)
public static Rectangle RecCenter(Vector2 center, int Size)
{
    return new Rectangle((int)center.X - Size / 2, (int)center.Y - Size / 2, Size, Size);
}

public override bool? Colliding(Rectangle projHitbox, Rectangle targetHitbox)
{
    bool intersects = false;
    for (int i = 0; i <= proj.Count; i++)// 是 <= 哦
    {
        if (targetHitbox.Intersects(RecCenter(data[i].pos, projHitbox.Width)))// 这里的碰撞箱已经应用了scale,所以直接拿他的宽
        {
            intersects = true;
            break;
        }
    }
    return intersects;
}
都看到这里了,你们应该明白为什么前边设置属性的时候要写正方碰撞箱了吧。
发射
细心看教程的话,你就会发现,AI中的两个list都还没有Add过元素。其实,对这两的Add,我把他们写在了发射弹幕时执行。我把发射整个多节召唤物写成了一个方法,塞在逻辑弹幕基类里,之后只要给武器重写 Shoot 函数,调用这个方法并 return false 即可。
这是个泛型方法,用于使用模式匹配强制转换获取里边的自定义字段或属性。
前四个参数,玩家实例、生成源、伤害、击退,这些在重写 Shoot 时都会给。但是,请把传入的 damage 设为物品的基础伤害,而不要直接用 Shoot 中给的 damage ,因为那个 damage 已经应用了物品所属伤害类型加成。第五个参数 amount 是单次召唤的身体体节的数量,并且会根据这个数量来设置身体体节所占用的召唤栏位。第六个是对应的召唤buff的 type ,接下去四个分别对应逻辑、头身尾弹幕的 type 。
发射的逻辑也很简单,寻找是否有属于玩家的逻辑弹幕,如果没有,就发射头尾+体节;如果有,就仅发射体节。同时,给两个list添加对应元素。
// 这个是用来方便设置的方法,因为player.SpawnMinionOnCursor不像NewProjectile方法一样能直接写ai01。另外加上了在这里设置弹幕召唤栏位占用
public static int SpawnMinion(Player player, IEntitySource source, int type, int damage, float kb, float ai0 = 0, float ai1 = 0, float minionSlots = 0)
{
int proj = player.SpawnMinionOnCursor(source, player.whoAmI, type, damage, kb);
Main.projectile[proj].ai[0] = ai0;
Main.projectile[proj].ai[1] = ai1;
Main.projectile[proj].minionSlots = minionSlots;
return proj;// 返回弹幕索引
}
public static void SummonSet<T>(Player player, IEntitySource source, int damage, float kb, int amount, int Logic, int Head, int Body, int Tail) where T : BaseLogicProj
{
// 寻找是否有属于玩家的这类逻辑弹幕
int logic = -1;
foreach (Projectile p in Main.projectile)
{
if (p.type == Logic && p.active && p.owner == player.whoAmI)
{
logic = p.whoAmI;
break;
}
}
if (logic == -1)// 没找到就发射逻辑弹幕和头身尾
{
// 发射逻辑弹幕
int L = SpawnMinion(player, source, Logic, damage, kb, 0, 0);
if (Main.projectile[L].ModProjectile is T Proj)// 使用模式匹配强制转换,以获取逻辑弹幕类里的字段属性
{
Proj.itemDamage = damage;// 传入基础伤害
Proj.buffType = SummonBuffType;// 传入bufftype
var proj = Proj.proj;// 获取逻辑弹幕类里的两个list
var data = Proj.data;
// 首先,向数据list添加元素。数量是要召唤的体节量+2(一个头一个尾)
// 至于这里加了个偏移是为了让之前那个目标位置-当前位置不为零
for (int i = 0; i < amount + 2; i++) data.Add((Main.MouseWorld + Vector2.One * i, 0));
// 生成头体节
int p = SpawnMinion(player, source, Head, damage, kb);
proj.Add(p);// 把头体节WhoAmI Add到proj列表
for (int i = 0; i < amount; i++)
{
// 按照传入的单次生成身体数召唤身体,每次使用物品占用一个召唤栏
// 所以这里把单个体节占用的召唤栏设为 1f / amount 。放心,弹幕的召唤栏位属性是float(比如双子眼召唤物)
int body = SpawnMinion(player, source, Body, damage, kb, i, 0, 1f / amount);
proj.Add(body);// 把身体节WhoAmI Add到proj列表
}
// 尾体节不需加入proj列表
// 但要把逻辑弹幕的tail设为尾体节的WhoAmI用于之后设置它的数据
Proj.tail = SpawnMinion(player, source, Tail, damage, kb);
}
}
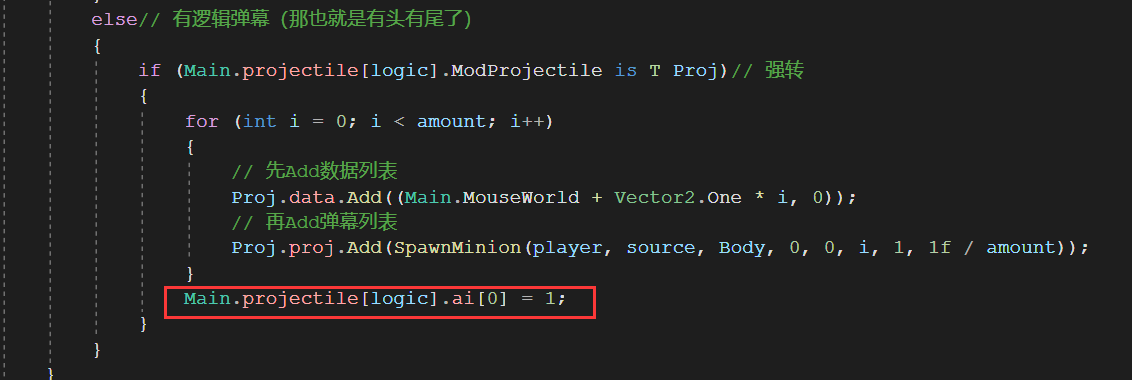
else// 有逻辑弹幕(那也就是有头有尾了)
{
if (Main.projectile[logic].ModProjectile is T Proj)// 强转
{
for (int i = 0; i < amount; i++)
{
// 先Add数据列表
Proj.data.Add((Main.MouseWorld + Vector2.One * i, 0));
// 再Add弹幕列表
Proj.proj.Add(SpawnMinion(player, source, Body, 0, 0, i, 0, 1f / amount));
}
}
}
}
嗯,可以看到我给身体弹幕的ai[0]传了一个i,这是为了,如果你的身体体节有多种,可以用这个来作为裁剪贴图的参数。比如星尘龙身体体节有两种,下边就讲。
重写绘制
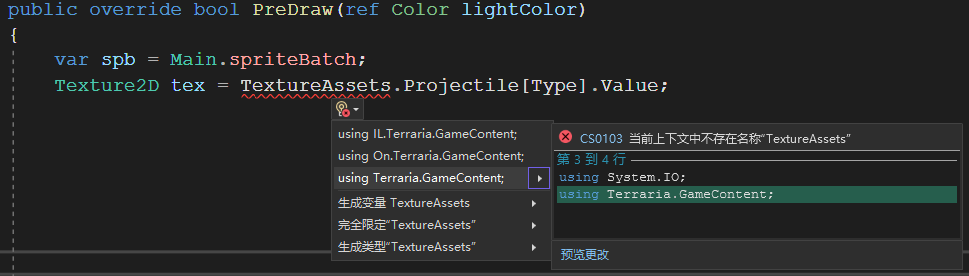
逻辑弹幕是不用画出来的,所以要把他的绘制给关掉。
public override bool PreDraw(ref Color lightColor)
{
    return false;// 关闭原版绘制
}
下边写给头身尾弹幕用。不过方法也一并塞在逻辑弹幕基类里
先以星尘龙贴图为例来看看吧。
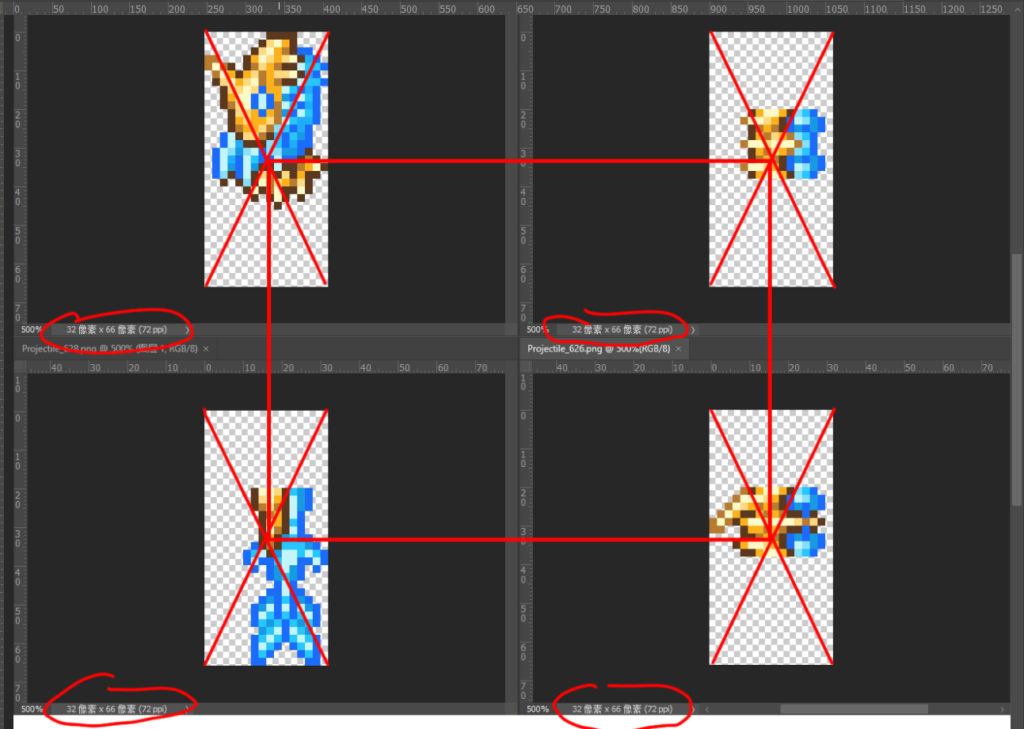
很容易能看出来——每种体节的贴图长宽相等,并且已经设置好了一个共同的中心。所以你们在准备贴图的时候也要做好这些工作。
TextureAssets.XXX[Index].Value 根据索引(索引是对应的 Type )获取贴图,XXX可以是Projectile,Item等等。
写一个方法用于之后重写绘制时直接设置,不用每次都敲Draw方法是好的。amount 是单次召唤的身体体节数量,color 用于传入颜色,rot 是贴图旋转,比如星尘龙贴图正方向是朝上的(-90°),需要+90°来把它转到泰拉的正方向(朝右)。
public static void DrawSet(SpriteBatch spb, Projectile proj, int Body, int amount, Color color, float rot)
{
    Texture2D tex = TextureAssets.Projectile[proj.type].Value;
    bool body = false;
    Rectangle rec = new();
    if (proj.type == Body)// 给身体体节做特判
    {
        body = true;
        // 根据身体的ai[0]来裁剪贴图,这里是纵向裁剪,有需要你们可以写个横向重载
        rec = new Rectangle(0, (int)proj.ai[0] * tex.Height / amount, tex.Width, tex.Height / amount);
    }
    spb.Draw(tex, proj.Center - Main.screenPosition, !body ? null : rec, color,
        proj.rotation + rot, (!body ? tex.Size() : rec.Size()) / 2f, proj.scale,
        Math.Abs(proj.rotation + rot) < Math.PI / 2f ? 0 : SpriteEffects.FlipVertically, 0);
    // 瞧见这里的rotation没,所以在SetPosAndDmg函数里又写了一次设置rotation,这可是很重要的
}
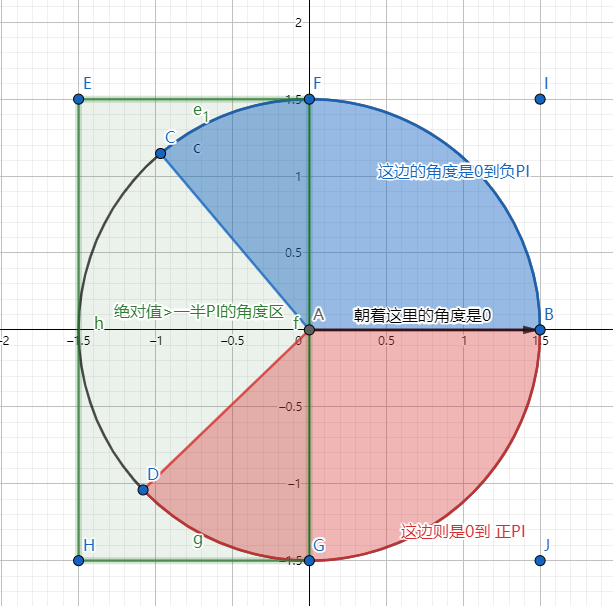
关于绘制翻转,因为泰拉角度写法比较神秘(请看下图),当角度大于PI就会变为反向计算。为了让弹幕贴图不要因为旋转导致倒着,我们让他在角度过大的时候对贴图进行垂直翻转。你可以想像一下,把星尘龙的头部贴图中心放在点A,让他朝着点B,然后做中心旋转。
至于为什么要裁剪?因为我把身体贴图拼起来了,毕竟只能传一个身体type。所以你们也要记得拼好身体贴图。

*联机同步
呃,这一段选看吧。
前置知识:联机同步
要进行联机同步,首先我们得知道什么需要同步,什么不需要同步,不分清楚这些的话,容易弄出奇怪的问题。同步是为了让别的客户端上的视效和主机保持一致,所以,弹幕的个数,位置,在哪一张帧图、方向角度等这些是需要做好同步的。
以下开始是对之前的代码进行补充修改。
身体体节的帧图问题
因为 Shoot 这个函数只在客户端上运行,所以我们在其中给身体体节传入的用于控制帧图的 ai[0],在别的端是一直等于0的,这里就需要在发射时进行一次同步。值得一提的是,在发射弹幕时把弹幕的 netUpdate 设为 true 并不会进行同步,所以这里把身体体节还未使用的ai[1]用于同步。首先,在发射时给ai[1]传入1,接着,在身体的AI中写上同步。

// 以下代码写在之后的身体AI中,你会在下文再次看到这段代码
public override void AI()
{
    if (Projectile.ai[1] == 1)
    {
        Projectile.netUpdate = true;
        Projectile.ai[1] = 0;
    }
}
弹幕位置和角度问题
因为计算并设置体节数据的代码会同时在客户端和服务器同时运行,所以,对于弹幕的位置和角度,我们无需进行同步。但是这必须保证逻辑弹幕中的 proj列表数据、data列表数据、tail数值 都正确,一旦列表对不上,就会出现一堆乱七八槽的诸如断节、错位、鬼畜等的情况。因为涉及到了自定义属性,所以这里使用 SendExtraAI和 ReceiveExtraAI来进行同步。
public override void SendExtraAI(BinaryWriter writer)
{
    // 发送弹幕list
    writer.Write(proj.Count);
    for (int i = 0; i < proj.Count; i++)
    {
        writer.Write(proj[i]);
    }
    // 发送tail
    writer.Write(tail);
    // 发送数据list
    writer.Write(data.Count);
    for (int i = 0; i < data.Count; i++)
    {
        writer.WriteVector2(data[i].pos);
        writer.Write(data[i].rot);
    }
}

// 按顺序接收数据,填充新list,将新list赋值回去
public override void ReceiveExtraAI(BinaryReader reader)
{
    int count = reader.ReadInt32();
    List<int> newproj = new();
    for (int i = 0; i < count; i++)
    {
        newproj.Add(reader.ReadInt32());
    }
    proj = newproj;
    tail = reader.ReadInt32();
    List<(Vector2 pos, float rot)> newdata = new();
    count = reader.ReadInt32();
    for (int i = 0; i < count; i++)
    {
        newdata.Add((reader.ReadVector2(), reader.ReadSingle()));
    }
    data = newdata;
}
tail是不会变的,所以我们只考虑list变动。那么,list什么时候会变动呢?一个是召唤新体节的时候,一个是体节被挤掉的时候。这里使用逻辑弹幕的 ai[0] 用于同步。

// 这是有体节被挤掉导致list长度变动的同步
for (int i = 0; i < proj.Count; i++)
{
    if (!Main.projectile[proj[i]].active)
    {
        proj.RemoveAt(i);
        data.RemoveAt(i + 1);
        i--;
        Projectile.ai[0] = 1;// 在有变动时把ai[0]设为1执行同步
    }
}

// 这里是计算并设置体节数据的那一部分

// 设置完所有体节数据之后,如果需要同步,则执行
if (Projectile.ai[0] == 1)
{
    Projectile.netUpdate = true;
    Projectile.ai[0] = 0;
}
这样,就可以实现在弹幕发射和削减时两个list的同步了。
到此,逻辑弹幕基类就写完辣。
实战
理论结束,开始应用!
接下来就以星尘龙素材为例,使用上面写好的基类,制作一个多体节召唤物看看。素材放在下面:
ModPlayer
创建一个类继承 ModPlayer 类,在里面定义一个 bool ,作为玩家是否有某召唤物的判断。并在 ResetEffects 方法中把他设为 false 。
public class MinionPlayer : ModPlayer
{
    public bool TestMinion;
    public override void ResetEffects()
    {
        TestMinion = false;
    }
}
Buff
平平无奇的写法,看过前置知识的都会写。
public class TestMinionBuff : ModBuff
{
    public override void SetStaticDefaults()
    {
        DisplayName.SetDefault("测试召唤物Buff");
        Description.SetDefault("测试召唤物正在保护你");

        Main.buffNoSave[Type] = true;
        Main.buffNoTimeDisplay[Type] = true;
        Main.debuff[Type] = false;
    }
    public override void Update(Player player, ref int buffIndex)
    {
        // 获取ModPlayer实例
        MinionPlayer modPlayer = player.GetModPlayer<MinionPlayer>();
        // 这是玩家某种弹幕的计数
        if (player.ownedProjectileCounts[ModContent.ProjectileType<TestMinion.Body>()] > 0)
        {
            modPlayer.TestMinion = true;
        }
        if (!modPlayer.TestMinion)
        {
            player.DelBuff(buffIndex--);
            return;
        }
        player.buffTime[buffIndex] = 18000;
    }
}
弹幕
创建一个类继承 BaseLogicProj 类。该写写该传传
再弄个基础召唤物出来,创建头身尾三类。虽说之前的发射方法中有设置了身体的召唤栏,不过如果你怕自己以后忘记,或者你想修改前面那个方法拿去干别的,那么你就可以在这里再写一次设置身体的召唤栏位。
public class TestLogic : BaseLogicProj
{
    public override float Offset => 1f;
    public override bool ModPlayerMinionBool// 把对应的bool拿过来
    {
        get => Player.GetModPlayer<MinionPlayer>().TestMinion;
        set => Player.GetModPlayer<MinionPlayer>().TestMinion = value;
    }
    public override void SetDefaults()
    {
        base.SetDefaults();
        // 如果要调整基础属性可别忘了base。当然你想全写一遍那就不用了
    }
    public override double ModifyDamageMult(int count)
    {
        return base.ModifyDamageMult(count);
    }
    // 使用默认逻辑
    public override void ActionAI()
    {
        base.ActionAI();
    }
}

public abstract class TestMinion : ModProjectile
{
    // 兴许需要重写一下贴图路径
    public class Head : TestMinion { }
    public class Body : TestMinion { }
    public class Tail : TestMinion { }

    public override void SetDefaults()
    {
        // 召唤栏问题
        /*if (Type == ModContent.ProjectileType<Body>())
        { Projectile.minionSlots = 1f / 3; }*/
        Projectile.width = Projectile.height = 32;
        Projectile.tileCollide = false;
        Projectile.ignoreWater = true;
        Projectile.friendly = true;
        Projectile.minion = true;
        Projectile.netImportant = true;
        Projectile.alpha = 0;
        // Main.projPet[Type] = true; 标记为宠物屏蔽接触伤害。这不正经,还是用下面的CanDamage吧
    }

    public override bool PreDraw(ref Color lightColor)
    {
        //这旋转角为什么是0呢?因为我事先把星尘龙贴图给转向了。素材包里的就是转过的。
        DrawSet(Main.spriteBatch, Projectile, ModContent.ProjectileType<Body>(), 2, lightColor, 0);
        return false;// 阻止原版绘制
    }

    // 阻止体节的接触伤害
    public override bool? CanDamage()
    {
        return false;
    }
    public override void AI()
    {
        // 上边联机同步中提到的代码
        if (Projectile.ai[1] == 1)
        {
            Projectile.netUpdate = true;
            Projectile.ai[1] = 0;
        }
    }
}
物品
创建一个类继承 ModItem 类,写好ssd和sd,注意 Item.Shoot 和 Item.ShootSpeed 不能为零。接着,重写 Shoot 函数,调用 SummonSet 方法并返回 false 。
public class TestMinionWeapon : MultipleSectionsMinionItem
{
    public override void SetStaticDefaults()
    {
        // 自己写
        SacrificeTotal = 1;// 旅途研究需要1个
    }
    public override void SetDefaults()
    {
        // 其它的自己写了
        Item.shoot = ModContent.ProjectileType<TestLogic>();
        Item.shootSpeed = 10f;
    }
    public override bool Shoot(Player player, EntitySource_ItemUse_WithAmmo source, Vector2 position, Vector2 velocity, int type, int damage, float knockback)
    {
        // 记得damage传入物品基础伤害Item.damage,amount因为星尘龙身体有两种,传2,这样他们的占用召唤栏位就会被自动设为0.5f,且一次召唤两个
        SummonSet<逻辑>(player, source, damage, knockback, 2, ModContent.BuffType<TestMinionBuff>(), type, ModContent.ProjectileType<Head>(), ModContent.ProjectileType<Body>(), ModContent.ProjectileType<Tail>());
        return false;
    }
    // 合成表啥的,自己整嗷
}
接下来就是保存、编译、进游戏看效果的时间了,可以开着Debug对 Offset(体节偏移率)和弹幕碰撞箱大小和倍率进行微调以达到最合适的效果。要记得考虑碰撞箱大小的合理性哦~(此处使用参数:32,1.25f,1 -> 0.45f)
看着还不错吧?
你们可以试着让体节在生成和死亡时淡入淡出且生成较为密集的粒子,在平时偶尔生成粒子,这样可以让这个召唤物变成贵物()这也是原版星尘龙有写的效果,以及可以给头身尾单独写AI,就像毁灭者一样体节射激光什么的。总之,希望你们融会贯通,不要只拘泥于教程。
那么到这里本篇教程就结束辽。
花絮 ¿ ?
关于开篇提到的超级大雷。
想必看到这个教程的裙友们已经知道如何发射弹幕了。(什么?你说你不知道?快去看前置知识啊!)
对,就是 Projectile.NewProjectile 和 Projectile.NewProjectileDirect ,前者返回弹幕的WhoAmI,后者直接返回弹幕实例。
在写教程之初,我上边写的 SpawnMinion 方法就是直接返回弹幕实例,然后往弹幕list里Add弹幕的 WhoAmI 就用了 Projectile p = SpawnMinion(xxx) ,proj.Add(p.WhoAmI) 。VS断点监测结果显示,初次发射时弹幕list里的三个元素数值全是0.
为什么呢?因为发射一个Projectile实体后,他的WhoAmI是下一帧才更新……这问题导致我写了一天无效代码(淦),裙友们要引以为戒(bushi)。感谢裙裙帮忙找到了这个大雷 阿巴阿巴阿巴阿巴阿巴阿巴阿巴阿巴阿巴